Mike Holmes' Secret to Stripping Popcorn Ceilings
Understanding Popcorn Ceilings and the Importance of Safe Removal
Popcorn ceilings, also known as textured ceilings, were a popular choice for home construction from the 1950s through the 1980s. These ceilings were favored for their affordability and ease of installation, making them an attractive option for many homeowners during that era. In addition to being cost-effective, they also had the benefit of soundproofing, which made them practical for homes with open floor plans or areas where noise reduction was needed.
However, over time, the aesthetic appeal of popcorn ceilings has diminished for many people. Additionally, there is a significant health risk associated with older popcorn ceilings: some of them may contain asbestos, a hazardous material that can cause serious respiratory issues if disturbed. Asbestos was commonly used in building materials before it was banned in the United States in 1973. Despite the ban, it’s still possible for homes built or renovated after that date to have asbestos in their ceiling textures.
This makes testing for asbestos a critical first step when planning to remove popcorn ceilings. If asbestos is present, it’s essential to hire a professional asbestos abatement specialist rather than attempting a DIY removal. Even if the test results are negative, taking proper safety precautions is still necessary to protect yourself from dust and debris.
Preparing Your Space for Removal
Before beginning any removal project, it's important to properly prepare your space. Mike Holmes, a well-known figure in home improvement, emphasizes the importance of creating a safe and organized work environment. Start by moving all furniture out of the room. For items that cannot be moved, cover them with plastic tarps to protect them from dust and debris.
Tape down sheeting on the walls and lay it over the floors to catch any falling particles. Ensure that all doorways are covered as well. Turn off your HVAC system during the job to prevent dust from spreading throughout your home. Remove or cover and tape off any light fixtures in the ceiling, and use painter’s tape to cover exposed wires and outlets to keep them dry. Finally, turn off the circuit breaker for the room you're working in, as you'll be using water during the process.
Protecting Yourself During the Process
Even if your ceiling doesn’t contain asbestos, it’s still crucial to prioritize your safety. Dust from the ceiling texture can irritate your lungs and eyes, so always wear a respirator and safety glasses. Holmes recommends using disposable coveralls to prevent dust from settling on your clothing, which can be discarded once the project is complete.
Gather all the necessary tools and supplies before starting. This includes a ladder, a floor scraper, a putty knife, and a pump sprayer. Once the ceiling is removed, you may need additional materials such as a drill, hammer, drywall screws, joint compound or spackling paste, and sandpaper blocks to repair any damage.
Step-by-Step Removal Method
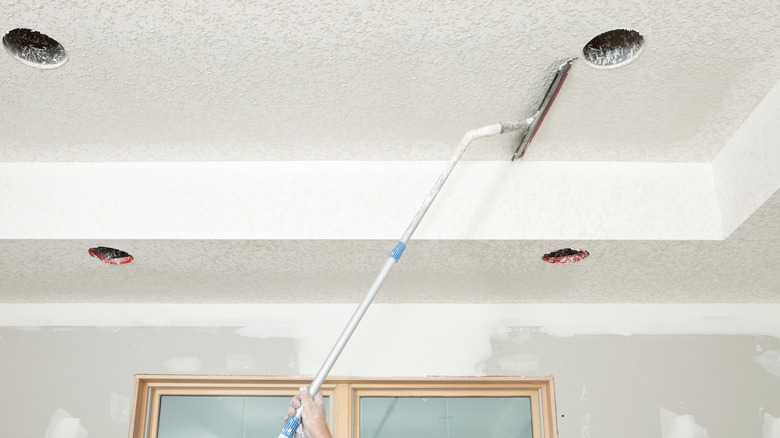
Mike Holmes suggests a simple and effective method for removing popcorn ceilings. Begin by filling your sprayer with water and adding a few teaspoons of dishwashing liquid. Work in manageable sections, approximately four feet square, to ensure control. Spray the ceiling with the water and soap mixture, making sure to moisten the surface without saturating it, as excessive moisture could damage the drywall underneath.
Allow the mixture to sit for about 20 minutes, then begin scraping the ceiling with a floor scraper or putty knife. To avoid damaging the drywall, Holmes advises filing down the edges of your scraper. If the texture doesn’t come off easily, you can spray the area again and repeat the process until the ceiling is clean.
Repairing and Finishing the Ceiling
One of the reasons builders used popcorn ceilings was to hide imperfections in the drywall. Removing the texture will expose these flaws, so it’s important to be prepared for some patchwork. Tighten any loose drywall panels with screws, hammer in raised nails, and fill any holes or dents with joint compound. Let the compound dry completely, then sand it smooth.
Once the repairs are complete, you can prime and paint the ceiling for a fresh, modern look. With careful preparation and attention to detail, removing popcorn ceilings can transform the appearance of your home while ensuring a safe and efficient process.
Komentar
Posting Komentar